1. Guide Overview
AgentVis supports communicating with Agents through Feishu or Slack messages: users message a bot in IM, the AgentVis desktop app receives it, sends the task to the bound Agent, and shows progress, stop controls, completion results, and errors in message cards.
The most confusing parts for ordinary users are usually not in AgentVis settings, but in the Feishu Open Platform or Slack App backend:
- Where to create the bot app.
- Which permissions are required.
- Which events must be subscribed.
- Whether a public callback URL is needed.
- Which IDs, secrets, and tokens need to be copied back to AgentVis.
- Why the bot still does not receive messages after setup.
AgentVis IM channels currently use long-lived connections:
- Feishu: uses Feishu Open Platform WebSocket long connections to receive events, with no public Webhook server required.
- Slack: uses Slack Socket Mode to receive events and interactivity callbacks, with no public Request URL required.
In other words, create the app in the platform backend, enable bot capabilities, grant permissions, subscribe to events, and enter the credentials back into AgentVis.
2. AgentVis Settings Field Reference
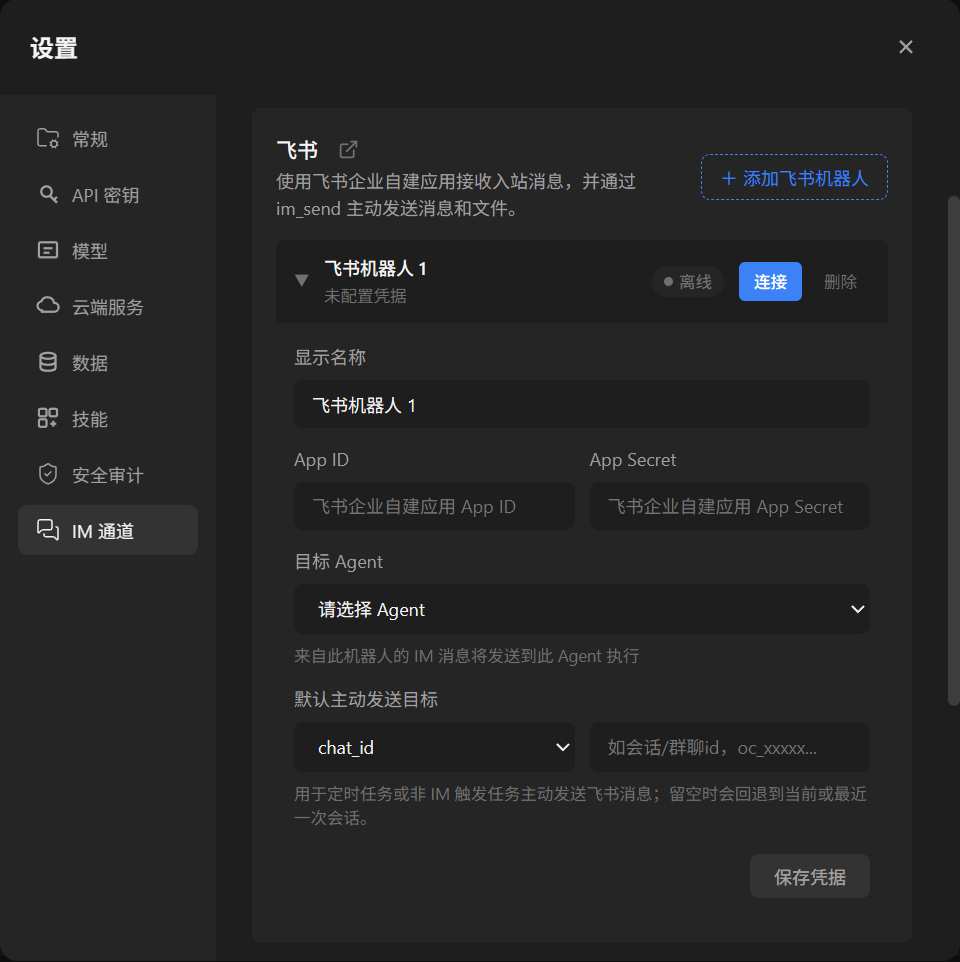
Open AgentVis, go to Settings, click IM Channel on the left, then choose Add Feishu Bot or Add Slack Bot.
2.1 Feishu Fields
| AgentVis Field | Where to Get It | Description |
|---|---|---|
| Display Name | Enter it yourself | Shown only in AgentVis settings. Use a business name, such as "Marketing Feishu bot". |
| App ID | Credentials and Basic Information in the Feishu Open Platform app | Looks like cli_xxx. |
| App Secret | Credentials and Basic Information in the Feishu Open Platform app | Sensitive information. Enter it only in AgentVis and do not share it. |
| Hub | Local AgentVis Hub | Used to narrow the selectable Agent list. |
| Target Agent | Local AgentVis Agent | IM messages from this bot are sent to this Agent for execution. |
| Default Outbound Target | Optional | Used by the im_send tool, Scheduled Tasks, and non-IM-triggered tasks. Leave it empty at first; AgentVis falls back to the current or most recent Feishu chat when possible. |
If you manually fill Default Outbound Target, group or one-to-one chats usually use chat_id, such as oc_xxx. Direct users can also use open_id, user_id, union_id, or email. If users only send tasks from Feishu, this field is not required at first.
2.2 Slack Fields
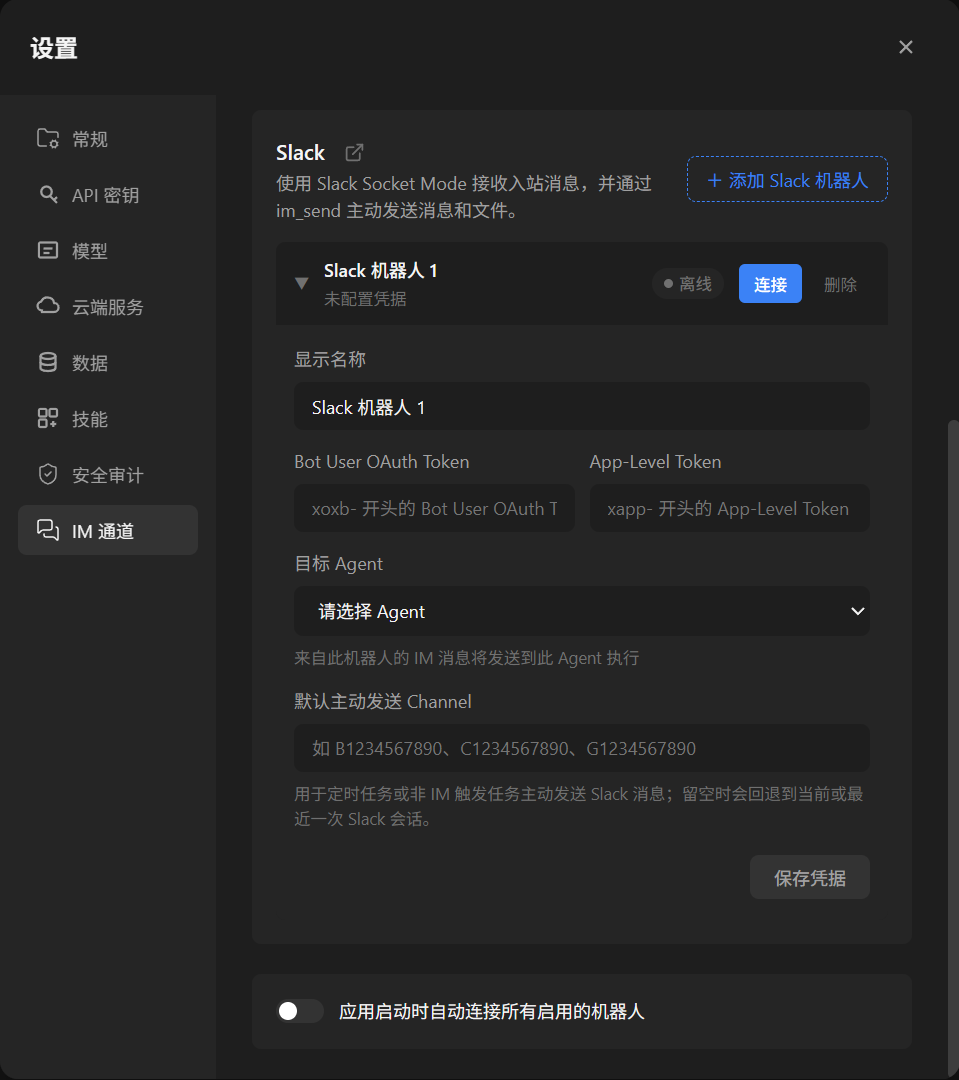
xoxb- and xapp- tokens, then choose which Agent should handle messages.| AgentVis Field | Where to Get It | Description |
|---|---|---|
| Display Name | Enter it yourself | Shown only in AgentVis settings. |
| Bot User OAuth Token | OAuth & Permissions in the Slack App | Looks like xoxb-.... Used to send messages, update cards, and upload files. |
| App-Level Token | Created from Basic Information -> App-Level Tokens or the Socket Mode guide in the Slack App | Looks like xapp-... and must include connections:write. Used for Socket Mode long connections. |
| Hub | Local AgentVis Hub | Used to narrow the selectable Agent list. |
| Target Agent | Local AgentVis Agent | Slack messages from this bot are sent to this Agent for execution. |
| Default Outbound Channel | Optional | Used by the im_send tool, Scheduled Tasks, and non-IM-triggered tasks. Leave it empty at first; AgentVis falls back to the current or most recent Slack conversation when possible. |
If you manually fill Default Outbound Channel, use the Slack Channel ID, not the channel name. Bot messages usually start with B, public channels with C, private channels or multi-person DMs with G, and one-to-one DMs with D.
3. Feishu Bot Configuration
3.1 Create a Custom Enterprise App
- Open Feishu Open Platform App Management.
- Sign in with your enterprise account.
- Click Create App.
- Choose Custom Enterprise App.
- Enter an app name, such as
AgentVis bot. Add an app description and icon as needed, then create it. - After creation, open the app details page.
3.2 Copy App ID and App Secret
- In the app details page, open "Basic Information -> Credentials and Basic Information".
- Find
App IDand copy it into AgentVisApp ID. - Find
App Secretand copy it into AgentVisApp Secret.
App Secret is sensitive. Store it only in AgentVis local credential storage. Do not screenshot it or paste it into chat groups.
3.3 Configure Permissions
Open "Development Configuration -> Permission Management -> Enable Permissions". You can copy the Scope values below. Different tenants may show localized names or scope names; if you cannot find one, search by scope.
| Scope | Purpose |
|---|---|
im:message.p2p_msg:readonly |
Receive one-to-one messages sent to the bot. |
im:message.group_at_msg:readonly |
Receive group messages that @mention the bot. |
im:message:send_as_bot |
Send text, card, image, and file messages as the bot. |
im:message:update |
Update AgentVis progress cards. |
im:message:recall |
Delete or recall messages sent by the bot. |
im:resource |
Upload and download images and file resources in messages. |
3.4 Configure Events and Callbacks
- Open "Development Configuration -> Events and Callbacks".
- Under Event Configuration, find Subscription Method, choose Use Long Connection to Receive Events, and save.
- Click Add Event and add
im.message.receive_v1andim.message.recalled_v1. - Under Callback Configuration, find Subscription Method, choose Use Long Connection to Receive Events, and save.
- Click Add Callback and add
card.action.trigger.
AgentVis receives events through long connections and does not need a public callback URL. As long as the AgentVis desktop app is online and connected to the bot, events arrive through WebSocket.
3.5 Publish an App Version
After changing permissions, event subscriptions, or bot capabilities, a Feishu app usually needs a new version published before changes take effect.
- Open Version Management and Release.
- Create a new version.
- Fill in release notes.
- Submit for release.
- If your enterprise requires admin approval, wait for approval.
If the bot still does not respond after configuration, first check whether you forgot to publish a new version.
3.6 Connect the Feishu Bot in AgentVis
- Open AgentVis "Settings -> IM Channel".
- Click Add Feishu Bot.
- Enter Display Name,
App ID, andApp Secret. - Select a Hub.
- Select the Target Agent.
- Leave Default Outbound Target empty at first.
- Click Save Credentials.
- Click Connect.
After connection succeeds, the status shows Online.
3.7 Test Feishu Messages
One-to-one test: in Feishu, for example on mobile, use the search button at the top to find the bot you created. Send it a text message such as "Please write a hello_world.md file and send it to me." AgentVis should receive the task and return a progress card in Feishu.
Group test: add the bot to a group chat and send @bot hello. AgentVis only handles group messages that @mention the bot; ordinary group messages without @mention are ignored.
File test: send the bot an image or file; it should inspect and reply. You can also send "Please find the XX file on my desktop and send it to me"; the Agent searches the computer and sends the file to Feishu.
4. Slack Bot Configuration
4.1 Create a Slack App
- Open Slack Apps.
- Click Create New App.
- Choose From scratch.
- Enter an app name, such as
AgentVis bot. - Choose the Slack workspace to install into.
- Click Create.
4.2 Configure Bot Token Scopes
In the Slack App backend, open OAuth & Permissions on the left, find "Scopes -> Bot Token Scopes", and add:
| Scope | Purpose |
|---|---|
app_mentions:read |
Receive messages that @mention the bot in channels. |
channels:history |
Receive public channel message events. |
groups:history |
Receive private channel message events. |
im:history |
Receive one-to-one DM message events. |
mpim:history |
Receive multi-person DM message events. |
chat:write |
Send text messages and AgentVis progress cards. |
files:write |
Upload images and files sent by Agents. |
files:read |
Download files users send to the bot in Slack. |
Optional permission: chat:write.public is only needed when the bot must proactively send messages to public channels it has not joined. Usually do not add it at first; invite the bot to the channel instead.
After adding or changing scopes, reinstall the app to the workspace; otherwise the new permissions will not be included in the xoxb- token.
4.3 Install the App and Copy Bot User OAuth Token
- Still on OAuth & Permissions, click Install to Workspace or Reinstall to Workspace.
- Authorize the app.
- Return to OAuth & Permissions.
- Copy Bot User OAuth Token.
- Paste it into AgentVis
Bot User OAuth Token.
This token usually starts with xoxb-.
4.4 Enable Socket Mode and Copy App-Level Token
AgentVis uses Slack Socket Mode, so no public Request URL is needed.
- Open "Settings -> Socket Mode" on the left and enable Socket Mode.
- Open "Settings -> Basic Information" on the left and follow the prompts to create an App-Level Token.
- Use any Token Name, choose
connections:writeas the scope, then copy the generated token. This token usually starts withxapp-. - Paste it into AgentVis
App-Level Token.
4.5 Configure Event Subscriptions
- Open Event Subscriptions on the left.
- Turn on Enable Events.
- Request URL is not needed when using Socket Mode.
- Open Subscribe to bot events and add the required events.
| Event | Required? | Purpose |
|---|---|---|
app_mention |
Required | Receive messages that @mention the bot in channels. |
message.im |
Required | Receive one-to-one DM messages. |
message.channels |
Recommended | Receive public channel messages. AgentVis still requires @mentioning the bot before execution. |
message.groups |
Optional | Receive private channel messages. |
message.mpim |
Optional | Receive multi-person DM messages. |
If users only need to use the bot through DMs, subscribe only to message.im. If users need to @mention the bot in channels, app_mention is required at minimum.
4.6 Enable Interactivity
- Open Interactivity & Shortcuts on the left.
- Turn on Interactivity.
- After Socket Mode is enabled, interactive components are sent to AgentVis through WebSocket, so no Request URL is needed.
- Save.
This lets AgentVis receive button clicks on cards, such as Stop Task or Delete Message. If it is disabled, users can see cards but button clicks will not trigger AgentVis.
4.7 Allow Users to DM the App
If users see a message such as "Sending messages to this app has been turned off" when opening the Slack App Messages tab, the message entry is usually disabled in App Home.
- Open App Home on the left.
- Find Messages Tab or Show Tabs.
- Enable the option that allows users to send messages from the Messages tab.
- Save.
4.8 Connect the Slack Bot in AgentVis
- Open AgentVis "Settings -> IM Channel".
- Click Add Slack Bot.
- Enter a display name.
- Enter
Bot User OAuth Token, which isxoxb-.... - Enter
App-Level Token, which isxapp-.... - Select a Hub.
- Select the Target Agent.
- Leave Default Outbound Channel empty at first.
- Click Save Credentials.
- Click Connect.
After connection succeeds, the status shows Online.
4.9 Test Slack Messages
DM test: find your app under Apps in Slack, open the Messages tab, and send a message such as "Please write a helloworld text and send it to me." AgentVis should receive the task and return a progress card.
Channel test: open the target channel, type /invite @your-bot-name to invite the bot, then send @your-bot-name hello. AgentVis should receive the message and reply.
File test: send a file to the bot; it should inspect and reply. With files:read, AgentVis can download Slack files sent by users. With files:write, Agents can proactively send files through im_send.
5. Troubleshooting
5.1 AgentVis Shows Offline
- Feishu: check whether
App IDandApp Secretare swapped or incomplete. - Slack: check whether
Bot User OAuth Tokenstarts withxoxb-...andApp-Level Tokenstarts withxapp-.... - Check that the Slack App-Level Token includes
connections:write. - Check whether the current network can reach
open.feishu.cnor the Slack API. - After permission changes, confirm that the Feishu app was republished or the Slack App was reinstalled.
5.2 Feishu Bot Does Not Receive Messages
- Confirm the bot is online in AgentVis.
- Confirm the Feishu app has the bot capability enabled.
- Confirm
im.message.receive_v1is subscribed. - Confirm the event subscription method is Use Long Connection to Receive Events.
- Confirm app permissions include one-to-one chat, group @mention, message sending, and resource permissions.
- Confirm a new version was published and approved by the enterprise if required.
- Check whether the bot was @mentioned in the group. AgentVis ignores group messages that do not @mention the bot by default.
- Old messages sent before successful connection may be ignored. Send a new message after the bot is online.
5.3 Feishu Card Buttons Do Not Respond
- Check whether
card.action.triggeris subscribed. - Check whether a new version containing that event was published.
- Check whether AgentVis is online.
- If the Feishu client shows a callback timeout toast but the card state updates correctly, you can usually ignore it. If buttons do nothing, check event subscriptions.
5.4 Feishu Image or File Sending Fails
- Check whether bot capability is enabled.
- Check whether
im:resourceis granted. - Check file size limits: AgentVis currently limits Feishu images to 10 MB and regular files to 30 MB.
- Check whether the app was republished after permission changes.
5.5 Slack Bot Does Not Receive Channel Messages
- Check whether the app is installed to the workspace.
- Check whether the bot has been invited to the target channel.
- Check whether the channel message @mentions the bot.
- Check whether
app_mentionis subscribed. - If relying on normal message events, check the related subscriptions: public channels
message.channels, private channelsmessage.groups, DMsmessage.im, and multi-person DMsmessage.mpim. - Check whether scopes include the corresponding history scope.
- After changing scopes or events, check whether you clicked Reinstall to Workspace.
5.6 Slack DM Says Users Cannot Message the App
Open App Home and enable the option to send messages from the Messages tab. After enabling it, you may need to reinstall the app or ask users to reopen Slack.
5.7 Slack Card Buttons Do Not Respond
- Check whether Interactivity & Shortcuts is enabled.
- Check whether Socket Mode is enabled.
- Check whether the App-Level Token includes
connections:write. - Check whether AgentVis is online.
5.8 Slack Message Sending or Deletion Fails
- Check whether
chat:writeexists. - Check whether the bot is in the target channel.
- Check whether Default Outbound Channel uses the channel ID, not the channel name.
- To send messages to public channels the bot has not joined, add
chat:write.public; however, inviting the bot into the channel is recommended first.
5.9 Slack File Download or Upload Fails
- Downloading files sent by users requires
files:read. - Agent-initiated file upload requires
files:write. - Check whether the app was reinstalled after changing scopes.
- Check whether the bot can access that channel or DM.
6. Recommended Checklist
6.1 Feishu
- Custom enterprise app is created.
- Bot capability is enabled.
App IDandApp Secrethave been copied to AgentVis.- Permissions include at least
im:message.p2p_msg:readonly,im:message.group_at_msg:readonly,im:message:send_as_bot,im:message:update,im:message:recall, andim:resource. - Event subscription uses long connection.
- Events
im.message.receive_v1andim.message.recalled_v1are added. - Callback
card.action.triggeris added. - A new app version has been published.
- Hub and Target Agent are selected in AgentVis.
- Bot status is Online in AgentVis.
6.2 Slack
- Slack App is created.
- Bot Token Scopes include at least
app_mentions:read,channels:history,groups:history,im:history,mpim:history,chat:write,files:write, andfiles:read. - The app is installed or reinstalled to the workspace.
xoxb-...has been copied to AgentVisBot User OAuth Token.- Socket Mode is enabled.
- App-Level Token is created with the
connections:writescope. xapp-...has been copied to AgentVisApp-Level Token.- Required bot events are added in Event Subscriptions.
- Interactivity is enabled.
- If DM is needed, the App Home Messages tab allows users to send messages.
- Hub and Target Agent are selected in AgentVis.
- Bot status is Online in AgentVis.
7. Security Recommendations
App Secret,xoxb-..., andxapp-...are sensitive credentials. Do not commit them to Git or send them to others.- If credentials may have leaked: reset App Secret in Feishu Open Platform and update AgentVis; for Slack, regenerate the relevant token in OAuth & Permissions or Basic Information, then update AgentVis.
- Grant bots the minimum necessary permissions. Add resource or file permissions only when file capabilities are needed.
- In Slack, invite the bot into channels first instead of granting
chat:write.publicat the beginning. - Bind each AgentVis bot to one clear Target Agent so users know who will execute IM tasks.
8. Reference Links
Feishu
- Feishu Open Platform App Management
- Receive Events with Long Connections
- Receive Message Event im.message.receive_v1
- Send Message API
- Card Interaction Callback
- Update Sent Message Cards
- Upload Images
- Upload Files
- Get Resource Files from Messages